Showing posts with label Frame. Show all posts

Wednesday, February 17, 2010

Round Up of Decorative Frames

I love the look of decorated picture frames. Since I'm going to install either a shelf or picture ledge in my living room and showcase photos, I've been obsessing about interesting and thrifty frame options. The other day I showed you how to make a frame using glass stones from the Dollar Store and one from old CD cases. Here are a few more options:


 These are from Better Homes and Gardens

A frame with buttons hot glued on.


Vintage serving pieces used to frame heritage photos. Looks like I might need to take a trip to the thrift store! (Who am I kidding? I'm there weekly anyway.)

 Black and white photos glued to the front of interesting looking books. This would be good if you need to fill in a lot of space.


Ohhh... I really like this one! How colorful and easy to coordinate (or accent) your room. Use paint chips, cut off the white bits, glue to your mat board. For this to be successful, use a very plain frame.


This is similar to using the vintage serving pieces. Use decorative plates with double stick tape to adhere the photo. I see so many cute orphan plates at the thrift store. I want to purchase them but never know what to do with them. Now I know! 

I'd also like this idea in the kitchen or dining room. Blow up a recipe card (I have my Grandmothers, Great Aunts and Mother's handwritten recipes) and use small plates to frame them out. I'd feel like I was cooking with them in the room with me.


These are from Martha Stewart (when I grow up I want to be just like Martha ... except for that prison thing of course).

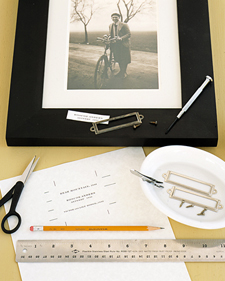
She adds labels to the picture frame. I know I've seen those label things in the scrapbook aisle at the craft store. I would add labels like "Alex, age 3", "1998" or "Virginia Smith". I'm definitely going to do this. I have several pieces on display my teenage son created in art school (he's very talented). I will put the title of the piece and the year on the label.


These frames are decorated with beans. Check the grocery store, there are many attractive (and cheap) beans you could use for this project. Just hot glue them in place.


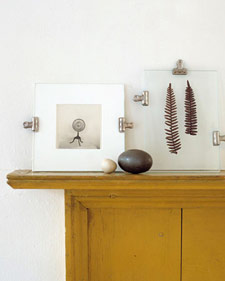
Have two pieces of glass cut and the edges ground smooth. Sandwich your photo or object between the glass and hold closed with binder clips. This has a modern or industrial look to it.


Cover the mat board with pretty fabric. Here she used neutral fabrics. I see it with bold graphics and colors. What a neat way to use up some fabric scraps you've been holding onto. Use hot glue to glue the corners down on the back side.

With all of these projects, don't use your only copy of a picture.  You can easily have digital copies made in minutes at drug stores,  Target, Walmart or photo stores (you can't copy copyrighted material) for only a few bucks. Using these decorative frames are not archival safe and you don't want to have your only copy of Great Aunt Lucy hot glued to the front of a book for all posterity. 

Did you make any of these projects? Send me a picture so I can show it off!

Tuesday, February 16, 2010

It's Craft Time! - CD Case Cube Frame


This is a fun way to display artwork, photos, 3D art or whatever strikes your fancy using only 4 clear CD cases. You can display items 4.5" tall x 5.25" wide by .25" deep. Think scrapbook pages with all the little do-dads! 

What you need: 4 CD cases (make sure they have no cracks and minimal scratches), 4 pictures and possibly a little tape. I also used some window cleaner as my cases were kind of grungy and smudgy looking. For me the project was free, since I have a bunch of CD's yet to be transferred to my computer. If you don't have any cases, you can always try Freecycle or purchase jewel cases at an office supply store. 

This project is a little fiddly. Just go slowly and gently. You don't want to snap the little hinges off the cases. But if you do, just grab another case. I made a couple of these and found one case that was to "loose" and wouldn't hold together with another case. I just swapped it out. I tried to take pictures for those visual learners among us. It is difficult to take a picture of a clear item, so some pictures have the CD art in them to help distinguish front from back.

Open the CD case, remove the CD, paper cover and back and the plastic piece that holds the CD. It will come out if you gently pry it up. I found starting in the middle, getting my nubby fingernails under it and working my way to the corners helpful. It will just pop out. Put your CD away, keep the case and discard the rest. Clean the inside of the case.

Open the case flat and notice the little inside ledges on each piece. There is also a distinctive front and back piece, see how they are different? The little ledges face each other when the case is closed. Open and close the case and see how the pieces fit together. This will help you when you put it back together.

OK, here is a tricky part. Take the front and back pieces apart by gently lifting in the connecting corner and sliding them apart. There are little plastic hinges. Flip one side over. If they are laying flat the little ledges are facing in opposite directions. Put them back together that way (ledges opposite). Form a 90 degree angle.

Do the last step to all 4 cases.

Place the item you want to display in a piece with the bigger ledge, facing out toward you. Since my picture was thin I used a small piece of tape on the back to hold it in place. You might have to play with the placement so it looks OK when the pieces are put together. (I had to move mine over so it wasn't stuck in the hing part of the case).

From two 90 degree pieces, connect a front and back CD piece to each other to hold the art in. OK this can be confusing. Look at two 90 degree pieces and think about how a CD case normally closes. You have a front and a back piece and both little ledge pieces face each other. Put your pieces together the same way, just as if you are closing a CD case over your art. You will have a 3 sided box.

Continue with the other  90 degree pieces, mounting your art, putting a front and back piece together and "closing" the CD case to hold the art in. Remember you are making a cube, so you may have to adjust the angle of pieces to fit.

The last piece is done the same way. However it may look different. The one little ledge piece is facing inside the cube. You have to gently place the 4th piece so the front and back are both inside and outside the finished cube. Just look at it and line up the little front and back case ledges so they face each other and close the case.

You are done! Take a deep breath and congratulate yourself! Use a little window cleaner and wipe your fingerprints off. A word of advice: don't try this at 10:00 pm when you are tired. By the way, the pictures I used are Romero Britto's work.


Did you try this project? If so, send me a picture so I can show it off!

Saturday, February 13, 2010

It's Craft Time - Glass Stone Frame

Here's my version of a Dollar Store craft. It's quick, simple, cheap and cute. Exactly my kind of project.

The supplies are 3 Dollar Store frames with a flat front, paint of your choice and brush, glass stones from the Dollar Store (over by the floral section) and a glue gun. The project cost me $4, since I had the paint and glue gun on hand. I chose to use the turquoise stones and  turquoise and white paint to coordinate with my living room.  I can't wait to see them up on my shelf or picture ledge (haven't decided what to hang yet).


 So onto the craft. Super simple. Take apart the frames and remove the glass and backing. Paint the frames and let dry.


Use your hot glue gun and glue the stones around the frame. Be careful with the glue gun and don't burn yourself! Put in the glass then your picture or as I used, a word. For fun free fonts go here. 


Et voila. You are finished. You could also use the clear stones with any color paint. They look especially good with silver or gold paint.

Related Posts Plugin for WordPress, Blogger...